| 1.0 Welcome |
HTML Basics |
| 2.0 Introducing HTML |
| 2.1 Page Layout |
| 2.2 HTML Files |
| 2.3 Text Formatting |
| 2.4 Lists & Extras |
| 2.5 Inlining Images |
Linking to Stuff |
| 3.0 Introduction |
| 3.1 Internal Links |
| 3.2 External Links |
| 3.3 Hot Links |
| 3.4 Image Maps |
Advanced HTML |
| 4.0 Tables |
| 5.0 Frames |
| 6.0 Forms |
Publishing Your Site |
| 7.0 Publishing |
| 7.1 Site Hosting |
| 7.2 FTP |
Appendix |
| Golden Rules |
| Color Codes |
| Typefaces |
| Escape Sequences |
Printable Version (pdf) |
Main Site:  |
So, you want to use various bits of an image to link to different things? Here's how...
Image maps are cool little gizmos. They are kinda like having "hot zones" on an image - multiple links in defined regions behind one graphic. They can be quite complex, but there are a number of programmes that can help you design one - check out the links on my Links Page. My favourite tool is called Coffee Cup Image Mapper, part of Coffee Cup's amazing range of web design software. You can get this Here.
There are two types of image map:
- Client Side: this type is supported by most browsers these days. The link behind the particular zone on the image map gets sent as an instruction to the server as to where to link to, just as with any other link.
- Server Side: This is the old type and is much more complicated as the server the other end receives the coordinates as opposed to, e.g. the URL. So, the server has to have something its end to tell it to which link the coordinates it has been sent refer! You need to know what type of server your ISP or you use to know which format to use for your map files. Much more complicated, and unnecessary these days - I have not bothered with this type at all in this tutorial.
Coding Client Site Image Maps
One you have designed the image you want to use as the image map, you would then use the format of code I use below in the place in your source code at which you want the image to appear:
<IMG SRC="nameofmapimage.gif" ALT="text you want here" BORDER="x" ISMAP USEMAP="#Name of map">
Then, either beneath the image map, or at the bottom of the page, you can put the actual coordinates which state which part of the image has which link attacked to it, as follows
<MAP NAME="Name of map">
<AREA SHAPE="shape" COORDS="x,y,x,y" HREF="link" ALT="Name of link">
<AREA SHAPE="shape" COORDS="x,y,x,y" HREF="Link" ALT="Name of link">
</MAP>
This is the code I used to make the map at the bottom of this page. This is the format I tend
to use, but the attributes can go in a different order to the above - it is just again a case of experimentation.
Obviously you need to have one bit of "AREA SHAPE" code for each link you want to make on
the image map! Details concerning the attributes are:
<IMG SRC...: The filename and its format for the image you want to "inline" as your image map...ALT..: Just put in something like "Image Map" just to tell text only browser users that this is what is located here!..ISMAP..: Just tells the browser to treat the image as a map...USEMAP..: Enter the name of the map - I tend to use something relating to the filename for the image. You have to enter this, because in the next part of the code where it says<MAP NAME...you need to use this same name in order to connect the rest of the code to this map! This is helpful if you have more than one image map on one page as the coordinate code goes by imagemap name, not its filename as defined in the IMG SRC tag above, so if you had more than one lot of coordinate code, the browser wouldn't otherwise know to which image you wanted the code to refer!!<MAP NAME...: As discussed above.<AREA SHAPE=: This can be "circle", "rect" or "poly", the latter which encompasses any irregular shapes. This is the shape (i.e. coordinates) of the particular clickable areas of the map...COORDS..: These coordinates are those that describe the shape and position on the image, of the clickable area. These are why it is best to use a programme to do image maps as coordinates can be rather complicated to work out!..HREF..: This is the link tag. You can put anything you would normally be able to put in a link, e.g. a mailto, internal or external link, link to a particular place on a page, etc.
Now I suggest you look at the source behind the image map that appears below. Actually, I have to admit that I mostly cheated! I designed a graphic in Corel Photopaint. Then set up the basic code in this page myself (e.g. to inline the image). Then I pulled the file into Dreamweaver, selected the image and then got the image map tool in Dreamweaver to calculate the coordinates (ie. where the links should appear) for me as it is far, far easier than trying to calculate this yourself!
Well, the graphic below took me about 10 minutes to design *and* code up! And, you know what? I think it looks pretty cool considering the short time I spent on it! Just goes to prove! Oh, and I checked the links and, yep, they work!
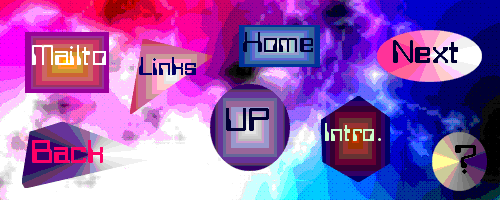
If you look at the code above this text which codes for the image map you see on the page,
you will see use of the TARGET attribute again for anything which is an external link. You will also
see that the name of the map is "TutorialMap" - the bit of code <MAP NAME="TutorialMap"> and
that this name also appears in the bit of code that actually inlines the image, against the USEMAP
attribute. I know I said this earlier above, but it is so important that it is worth
reapeating - these two names must match! It means that you can have more than one image map on your page - you
just need to make sure the name against the USEMAP attribute is the same as the name in the
<MAP NAME="... of the bit that codes for the links.
NEXT: what about tables and other more advanced HTML?
 |
 |
 |


 © 1998-2008